In this blog, I'll walk you through how I automated email sending using Google Sheets and Google Apps Script. This system allows you to compose, personalize, and send emails directly from your spreadsheet — without manually opening Gmail. It's ideal for reminders, newsletters, or any scenario where you need to reach multiple recipients efficiently.
Introduction
Automating email sending in Google Sheets with Apps Script allows you to streamline communication by sending personalized emails directly from your spreadsheet. With a few lines of code, you can automate tasks like sending reports, reminders, or notifications based on sheet data. This eliminates manual effort, improving efficiency and accuracy. While this feature mostly works with Google Workspace accounts, some functionalities may be limited for personal Gmail users. In this guide, we'll explore how to set up and use Google Apps Script for automated email workflows.
Project Setup
For this tutorial, we will set up a simple Google Sheet with dummy data. Ensure that the email addresses
you
enter are valid to avoid errors during execution.
Steps to Set Up Google Sheets:
- Open Google Sheets.
- Create column headers in the first row.
- Enter sample data below these headers, ensuring each row contains a unique email.
SNo | Name | Email | Status
-----------------------------------------------------
1 | Alice | alice@example.com |
2 | Bob | bob@example.com | - Open Google Apps Script:
- Navigate to Extensions > Apps Script.
- This will open the script editor, where we will write code to automate email sending.

Apps Script
On the Apps Script page remove any existing code and paste the following script:
function onOpen() {
const ui = SpreadsheetApp.getUi();
ui.createMenu('Custom Actions')
.addItem('Send Emails', 'sendEmails')
.addToUi();
}
function sendEmails() {
// Get active spreadsheet and data
const sheet = SpreadsheetApp.getActiveSpreadsheet().getActiveSheet();
const data = sheet.getDataRange().getValues();
// Find column indexes
// change these according to your headers
const headers = data[0];
const SNO_INDEX = headers.indexOf('SNo');
const NAME_INDEX = headers.indexOf('Name');
const EMAIL_INDEX = headers.indexOf('Email');
const STATUS_INDEX = headers.indexOf('Status');
if (SNO_INDEX === -1 || NAME_INDEX === -1 || EMAIL_INDEX === -1 || STATUS_INDEX === -1) {
throw new Error('Required columns (SNo, Name, Email, Status) are missing!');
}
// Loop through each row
for (let i = 1; i < data.length; i++) {
const row = data[i];
const name = row[NAME_INDEX];
const email = row[EMAIL_INDEX];
const status = row[STATUS_INDEX];
// Skip if email is already sent
if (status === 'Email Sent') {
continue;
}
// Send email
try {
GmailApp.sendEmail(
email,
'Custom Email Subject',
`Hello ${name},\n\nThis is an automated email from Google Sheets.\n\nBest regards,\n Raj!`
);
// Update status column
sheet.getRange(i + 1, STATUS_INDEX + 1).setValue('Email Sent');
} catch (error) {
console.error(`Failed to send email to ${email}: ${error.message}`);
}
}
SpreadsheetApp.flush();
SpreadsheetApp.getUi().alert('Emails have been sent successfully!');
}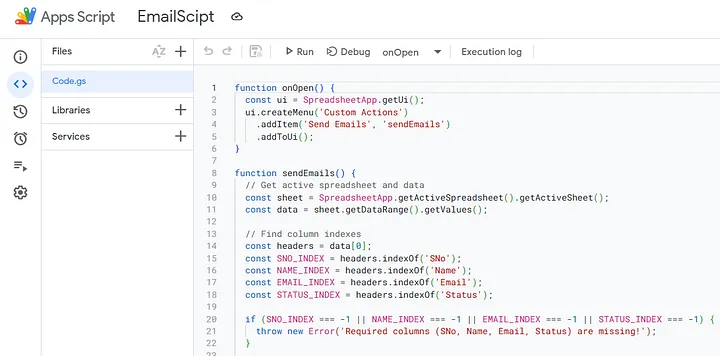
The following code will add a Custom Actions button to the current Google Sheet. This button will
contain a
"Send Emails" option in a dropdown menu, allowing you to trigger the email-sending function.
Once an email is sent, the corresponding row in the Status column will be updated to "Email Sent" to
prevent
duplicate emails when the script runs again with new data.
This ensures that only new recipients receive emails, making the process efficient and error-free. Now,
let's
proceed with adding this functionality using Google Apps Script.

Usage
Using the Script
Using the email automation script is straightforward.
Follow these steps:
- Save the script in the Apps Script editor.
- Refresh the Google Sheet to load the custom menu.
- Go to Custom Actions > Send Emails to trigger the script.
First-Time Use Issues
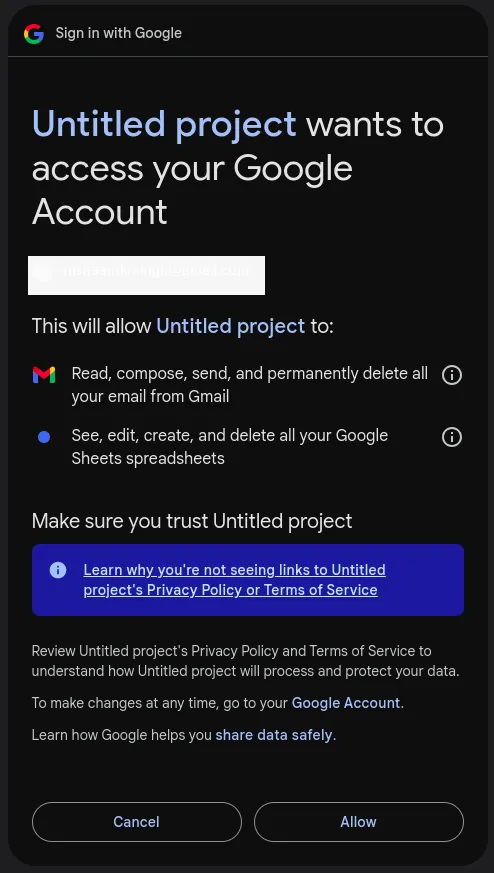
The first time you run the script, Google will prompt you to grant permission since it accesses Gmail
and Google
Sheets.
- A warning will appear stating the script is "unsafe" because it is not verified by Google.
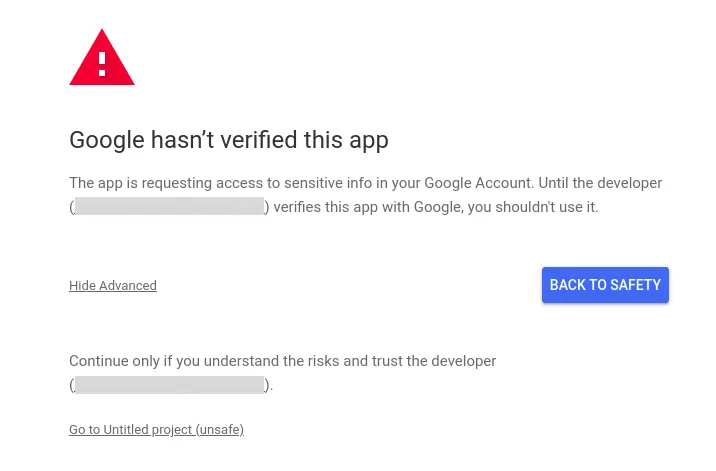
- Click "Go to [Your Project Name] (unsafe)" to proceed.
- Allow the script to access the required Google services (Gmail & Sheets).
Once permissions are granted, the script will function smoothly, sending emails whenever triggered without any further prompts.
Unsuccessful Delivery
In case of any unsuccessful delivery, you will automatically receive an error mail in your mailbox explaining the issues.

Customization Guide: Make the Script Fit Your Needs
Google Apps Script offers great flexibility, allowing you to tailor the script for different use cases. Below are some common customizations to enhance your automated email system.
- Change Email Subject and Body
- Use placeholders like ${variable} to dynamically insert data.
- Add URLs or use HTML formatting for rich-text emails.
- Add New Columns for More Context
- Add new columns in your Google Sheet (e.g., Role, Company).
- Retrieve the data in the script:
- Include them in your email:
- Ensure column names match exactly in the script.
- Always check if the column exists using indexOf
- Filter Rows Based on Conditions
- Only send emails to people from a specific company.
- Skip recipients without a valid email address.
- Send Rich-Text Emails (HTML Formatting)
By default, the script sends a simple email:
GmailApp.sendEmail(
email,
'Custom Email Subject',
`Hello ${name},\n\nThis is an automated email from Google Sheets.\n\nBest regards,\nYour Name`
);Add More Personalization.
If your sheet includes a Company column, you can include it in the
email:
const COMPANY_INDEX = headers.indexOf('Company');
const company = row[COMPANY_INDEX];
GmailApp.sendEmail(
email,
`Hello ${name} from ${company}!`,
`Hi ${name},\n\nWe are excited to connect with someone from ${company}.\n\nBest regards,\nYour Team`
);Tips:
Currently, the script uses SNo, Name, Email, and Status. If you want to include Role, Company, or Phone Number, follow these steps:
const ROLE_INDEX = headers.indexOf('Role');
const role = row[ROLE_INDEX];GmailApp.sendEmail(
email,
`Hello ${name}, our esteemed ${role}`,
`Hi ${name},\n\nWe noticed you're a ${role} at ${company}.\nLooking forward to collaborating!\n\nBest regards,\nYour Team`
);Tips:
Send Emails to Specific Recipients
Example: Skip Invalid Email Addresses
if (!email || !email.includes('@')) {
console.warn(`Skipping invalid email for ${name}`);
continue;
}You can send emails with HTML formatting using htmlBody.
Example: HTML Email Body
const emailBody = `
<h2>Hello ${name},</h2>
<p>We are excited to have you onboard!</p>
<p>Best regards,<br><strong>Your Team</strong></p>
`;
GmailApp.sendEmail(email, 'Welcome Email', '', { htmlBody: emailBody });Final Thoughts on Customization
- Start Simple: Get the script working first.
- Add Complexity Gradually: Add custom columns, and conditions step-by-step.
- Monitor and Optimize: Use logs (Logger.log()) to debug failures or inefficiencies.
With these customizations, you can automate newsletters, follow-ups, and custom alerts, making your workflow more efficient. 🚀